Metronome Control
A metronome makes audible clicks or other sounds that correspond to beats at a selectable tempo, providing the musicians with a tempo reference while recording. This is especially useful when recording drums or other rhythm-intensive tracks, as the editing and arranging processes are made much easier when the recorded audio lines up with musical bars and beats.
In Studio One, the metronome can be engaged and disengaged both globally and for each hardware output in the Console, including the Main Out and any Sub Outs.
Turn the Metronome On/Off Manually
In the Transport, the Metronome button is to the left of the Master Volume fader and meter. Click on the Metronome button, or press [C] on the keyboard, to globally engage and disengage the metronome. The metronome is globally disengaged by default.

The Output Channels in the Console also feature Metronome buttons and level controls above the volume fader. These controls allow you to choose, for each output, whether or not the metronome is heard, and its level.
Metronome Setup
Click the Metronome Setup button (next to the Metronome button in the Transport) to access the Metronome Setup menu. In this menu, you can configure sounds and behavior for the metronome, as well as Precount and Preroll.
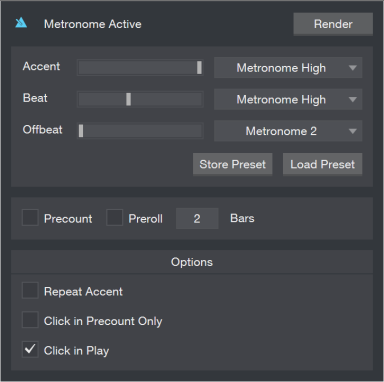
Here, you can choose an individual sample and volume level for Beats, Accents, and Offbeats. Accents play on the downbeat, or first beat, of each new bar. Offbeats play in the space between each Beat. You can choose from seventeen default samples for each, including Click, Clave, Rim Shot, and Tambourine. By default, the Accent Level setting is higher than the Beat Level setting, as most musicians like to have the downbeat of each bar emphasized to help keep time.
Metronome Presets
Once you have configured the Metronome, you can save the current setup as a preset by clicking the [Store] button. These presets can be recalled at any time by clicking the [Load] button.
Precount and Preroll
Precount and Preroll are two methods you can use to signal the start of recording and give a sense of the song’s tempo to a musician before recording begins. When you click Record with Precount enabled, the metronome clicks for the number of bars specified in the Bars parameter, before recording starts. When you click Record with Preroll enabled, Studio One starts playback behind where the cursor is placed, by a number of bars specified by the Bars parameter. When playback passes the cursor position, recording starts.
When Precount is enabled, pressing record shows a countdown in the record button, of the number of beats remaining before recording starts.
Precount can also be enabled by clicking the Precount button, to the left of the Metronome buttons in the Transport, or by typing [Shift] + [C]. Preroll can also be enabled by typing [O].
Repeat Accent
This setting repeats the Accent sound when using a time signature with more than one accent per bar, such as 12⁄8. You can try this out by doing the following:
Open the Metronome settings, and chose a sound for the Accent that is different from both the Beat and the Offbeat. Leave the Repeat Accent checkbox empty. Make sure the Click in Play option is active, so that you can hear the Metronome during playback. Set the time signature to 12⁄8, and either click the Play button or press the Space Bar. You’ll notice the Accent is only heard every 12 beats. However, if you go through steps 3 and 4 with the Repeat Accent function switched on, the Accent is heard every 3 beats.
Click in Precount Only
When recording is triggered with Pre-Roll engaged, as discussed in the Precount and Preroll section of this chapter, a specified number of Precount bars play before reaching the current playback cursor position. The number of Precount bars is specified in the Metronome Setup menu. In this same menu, there is a checkbox to engage the Click Only in Precount option, which is disengaged by default.
With Click Only in Precount engaged, the metronome provides a traditional count-in during the Precount bars and is not heard beyond those bars.
Click in Play
The Click in Play option in the Metronome setup menu allows you to enable/disable the Metronome during playback, as opposed to while recording. Disabling Click in Play allows you to leave the Metronome engaged in the Transport at all times, so that if you are recording, you hear a click, but if you are playing back, you do not hear the click. Click in Play is engaged by default; click on the Click in Play checkbox to disengage the Metronome during playback.
Render Metronome
You can create an Audio Track of the Metronome by clicking the [Render] button located in the upper-right corner of the Metronome Setup window, and choosing one of the Render range options. These options allow you to create a click track that is either the full length of your Song, or just the length of a looped range within it, such as 4, 8, or 16 bars.
Text and images reproduced from the official Studio One Version 3.3.0 Reference Manual Copyright © 2016 PreSonus Audio Electronics, Inc