The Console
Mixing in Studio One is primarily done in the Console. Open the Console by clicking on the [Mix] button or by pressing [F3] on the keyboard.
Each channel of audio in your Song is represented by a Channel in the Console. Audio Tracks in the Arrange view are directly represented by Audio Channels in the Console, whereas Instrument Tracks have no direct representation in the Console. Instead, Instrument Channels represent the audio output of virtual instruments. There are several other Channel types discussed below, including Input, Output, Bus, and FX Channels.
It is important to note that the Console opens by default in Small mode, and the following descriptions assume this mode is engaged unless otherwise noted. For more on this topic, refer to the Alternative Console Layout section of this chapter.
Channel Features
The following features are common to all Channels.
Input/Output
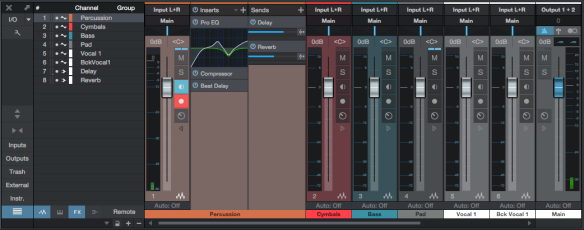
At the top of each Channel is a display of its configured Input and Output, with the Input shown at the top and the Output below it. All Channels are configured with Main Out as their Output by default.
Audio Channels show the hardware audio input selection. Instrument Channels display the name of the virtual instrument from which they get their input. Bus and FX Channels display a graphical count of the number of Tracks assigned or sent to them, rather than a discrete display of input channels, as their input source is usually from multiple Channels. Click on the Input area on a Bus or FX Channel to display a pop-up list of all assigned/sent Tracks. Clicking on a Track in this list selects and expands that Track in the Mix view.
Click on any Input or Output to display and choose from a list of available routing options for any Channel. Clicking on the Input for an Instrument Channel opens the interface for the source virtual instrument.
Panner and Fader
All Channels feature a horizontal panner and vertical volume fader below the I/O-selection display. The panner can be clicked-and-dragged horizontally, allowing the audio for each Channel to be positioned left or right in the stereo field. The volume fader can be click-and-dragged vertically to control the output volume for each Channel. Numerical values may also be entered for pan and volume.
Studio One uses a -3 dB pan law for all channel panning. On stereo Channels, the panner adjusts the balance of left and right signal levels.
Mute/Solo
Channels can be muted or soloed by clicking on their Mute and Solo buttons, respectively. You can also press [M] for Mute or [S] for Solo on the keyboard to mute or solo selected Channels. Muting silences the Channel’s audio from the Console so you won’t hear it. Soloing silences all except the audio for the soloed Channel, so you only hear the soloed Channel. Any number of Channels can be muted or soloed at one time.
When using the [M] or [S] keys to mute or solo an Instrument Track that has a virtual instrument attached to it, mute or solo is applied to the note data Track in the Arrangement view, rather than to the audio Track in the Mix view. [M] and [S] have no effect on Bus or FX Channels.
You can perform a Global Solo Off, which disengages Solo on any Track that has it engaged, by pressing and holding [Ctrl] on the keyboard and then clicking on any Solo button. Performing the [Ctrl]-click again recalls the previous solo settings, returning any previously soloed channels to the solo state. This can be useful when comparing a group of soloed Tracks to other Tracks in your mix.
Automation Mode
The Automation mode for each Channel is displayed at the bottom of the Channel. By default, this mode is set to Off. Click on this display to choose an Automation mode or to add and remove automation parameters.
Name
Channel names are shown at the bottom of each Channel in the Console. Double-click on the name, type a new name, and then press Enter to change the name of any Channel.
Expand Channel
All Channels feature an Expand Channel button, which expands the visible Channel to the right, revealing further Console routing possibilities. Audio, Instrument, and Bus Channels include Insert and Send Device Racks. FX Channels only have an Insert Device Rack.
Channel Types
Input
Input Channels represent the configured hardware audio inputs. They can be mono or stereo, depending on the configuration of the hardware input they represent. Use the Input Channels to accurately meter inputs or to add effects processing to an input.
Audio
Audio Channels are direct representations of Audio Tracks in the Arrange view. Each Audio Track has a corresponding Audio Channel in the Console, with corresponding Record Enable, Monitor Enable, Solo, and Mute controls.
Instrument
Instrument Tracks in the Arrange view have no directly corresponding Channels. An Instrument Track outputs to a virtual instrument, and the virtual instrument then creates sound. Thus, virtual instruments output audio to Instrument Channels in the Console. A virtual instrument might have any number of outputs, as described in the Set Up Multiple Virtual Instrument Outputs section of the Recording chapter, and each has a corresponding Channel in the Console.
Bus
The audio output of multiple Channels can be routed directly to a single Bus Channel, which is always a stereo Channel. This lets you create a submix so that the audio from several Channels can be processed together before being routed to the main output. Although less common, it is also possible to use Sends to route audio to Bus Channels.
For instance, several drum Tracks might be routed to a Drum Bus, where the audio is compressed and equalized, and then routed to the main output. That audio could also be routed to an FX Channel, through a Send, to apply a reverb effect, which would be applied to all audio routed to that FX Channel.
FX
FX Channels are what are traditionally known as effects return channels, used to apply effects to multiple signals simultaneously through the use of Sends. Audio can be routed from any Channel through a Send to an FX Channel, which can have any number of effects inserted in its Insert Device Rack. For instance, several keyboard Tracks and a guitar Track could be routed via Sends to an FX Channel with a reverb plug-in inserted, so that all of the instruments sound like they are in the same physical space.
Dragging an audio effect or FX Chain to the Send slot of a Channel in the Console creates a new FX Channel with the same name as the effect or FX Chain, and routes audio from the original Channel to the new FX Channel, via a Send.
Output
Output Channels are routed directly to hardware audio outputs and can be stereo or mono, depending on the configured outputs to which they connect. Every Song has at least one stereo Output Channel, which is named Main Out by default. The Main Out is, by default, where the entire Console mix of all other Channels is routed. You generally listen to this output when monitoring your mix, as this is the output from which exported mixdowns are derived.
The Main Out Channel is always locked to the far right end of the Console and cannot be moved. This output features a stereo Peak/RMS Meter, as well as K-System Metering. Other configured hardware outputs are represented in the Console by a type of Output Channel called a Sub Out. Sub Outs appear to the right of the mixer when the Outputs panel is open.
The Main Out and Sub Out Channels feature Metronome controls, allowing independent metronome on/off and level control for each hardware output. Note that every stereo Output Channel also features a Mono switch to allow for quick summed-mono monitoring, which is commonly used to check a mix for mono compatibility.
Text and images reproduced from the official Studio One Version 3.3.0 Reference Manual
Copyright © 2016 PreSonus Audio Electronics, Inc