Impact
Impact features a grid of pads into which samples are loaded and played back independently, as with many popular hardware drum-sample players. Each pad has its own pitch, amplifier, and filter controls with accompanying envelopes. There are multiple stereo and mono outputs for each pad, making sophisticated output busing simple.
Interface
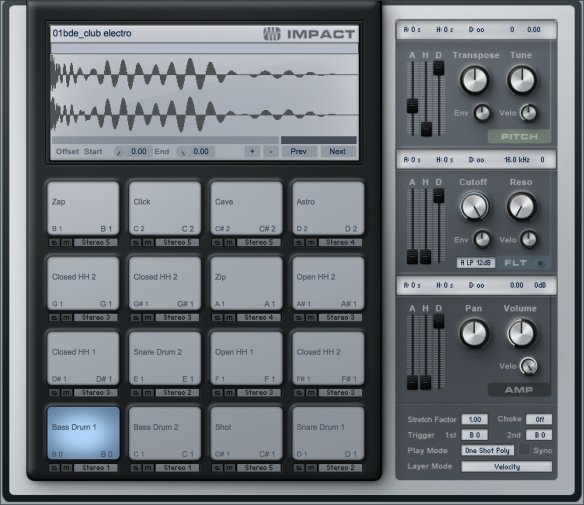
Impact is arranged as a 4x4 grid of pads, with controls for each pad. Below each pad are Solo and Mute controls, as well as an Output Channel assignment. Click on any pad to select it and view its parameters, located on the right side of the interface. In the lower left corner of the waveform display are Offset Start and End controls, which let you offset the playback of a sample start or end from -0.5 to 0.5 s. To the right of these controls are Add and Remove sample buttons for adding or removing a sample from the currently selected pad, as well as Previous and Next buttons to select the previous or next sample in the same file location as the existing sample.
Above these controls on the far right is a sample-zoom control, with a scrollbar to the left. Click on the Zoom control to zoom in or out on the sample, and use the scrollbar to scroll across the sample left or right if zoomed to a level where the entire sample is not viewable.
Add and Play Samples
To add a sample to a pad, drag any audio clip from the Browser, or any Audio Event or selected range from the Arrange view, directly onto the desired pad. If you drag in a selected range from the Arrange view, the range is bounced to a separate audio file and then added to Impact. Dragging a sample to a pad that already contains a sample replaces the old sample with the new one, by default. To clear a pad of all samples, [Right]/[Ctrl]-click on the desired pad and select Clear Pad.
Once a sample has been added to a pad, you can trigger the sample by clicking on the pad with the mouse or by playing that pad’s assigned note on your Keyboard. There are two note assignments per pad, displayed at the bottom left and right corners of each pad. You can change the note assignment by clicking on a pad, then clicking in the Trigger 1st or 2nd fields in the lower left corner of Impact and either entering a value or playing a note on your Keyboard.
Each pad has a selectable playback mode in the lower right corner of Impact. You can choose from the following:
- One Shot Poly This mode means the pad trigger starts playback of the entire sample, which does not stop until the end of the sample is reached. If multiple triggers occur before the end of the sample is reached, the sample is played multiple times at once, with each new triggered sample overlapping the any other playing voices.
- One Shot Mono This mode means the pad trigger starts playback of the entire sample, which does not stop until either the end of the sample is reached, or another pad trigger occurs.
- Toggle This mode means the pad trigger starts playback of the sample, and if another pad trigger occurs while the sample is playing, the sample stops playback.
- Note On/Off This mode means that the note-on event for the trigger starts sample playback, and the note-off event stops it.
- Sync To the right of the Play mode selection box is a Sync checkbox. Engage this option if you would like sample playback to start on the nearest beat to the trigger time, as determined by the Arrange quantize value. To solo a pad so that you hear only its sound when it is triggered, click on the Solo button beneath the desired pad. To mute a pad, so that pad is not be heard when triggered, click on the Mute button beneath the desired pad.
Note that each pad has its own Pitch, Filter, and Amplifier controls.
Multiple Velocity Layers
It is possible to add more than one sample to a pad, enabling you to trigger different samples based on velocity. For instance, you may want to have three different samples for a single snare drum pad: one soft, one medium, and one loud. This way, when you play Impact, the snare drum sounds much more realistic than if you use a single sample.
To do this, hold [Shift] when dragging a sample or clip to a pad. This adds a new layer to the pad, indicated by the bar graph in the sample display. Click-and-drag the bar graph left or right to alter the velocities at which the samples trigger. The velocity range for the currently selected sample is highlighted.
Pitch Control
You can modify the pitch for each pad’s sample using the Pitch controls.
- Pitch Envelope
- Attack Adjusts the amount of time from when the pad is triggered to when the envelope value is reached. Variable from 0 s to ∞.
- Hold Adjusts the amount of time the envelope value is held after the attack period and before decay begins. Variable from 0 s to ∞.
- Decay Adjusts the amount of time it takes after the hold period to return to the envelope value. Variable from 0.98 ms to ∞.
- Pitch
- Envelope Adjusts the detune range of the pitch envelope in cents. Variable from -1,200 to 1,200 cents. (The default value is 0, meaning the pitch envelope has no effect.)
- Velocity Adjusts the maximum detune value, in cents, that pitch is affected by velocity (the maximum detune value when triggered note velocity equals 127). Variable from -1,200 to 1,200 cents.
- Transpose Adjusts the transposition in semitones for the selected pad. Variable from -10 to 12.
- Tune Adjusts the tuning, in cents, for the selected pad. Variable from -100 to 100 cents.
Amplifier Control
To adjust the amplitude for each pad, use the following parameters:
Amp Env
- Attack Adjusts the amount of time from when the pad is triggered to when maximum amplitude is reached. Variable from -∞ (no attack, sample starts at maximum amplitude) to 0 s to ∞.
- Hold Adjusts the amount of time the maximum velocity is held after the attack period, before decay begins. Variable from 0 s to ∞.
- Decay Adjusts the amount of time it takes after the hold period to reach an amplitude of -∞ from the maximum amplitude. Variable from 0.98 ms to ∞.
Amplifier
- Velocity Adjusts the maximum amplitude value, in dB, affected by velocity (the maximum amplitude value when triggered note velocity equals 127). Variable from -∞ to 0 dB.
- Pan Adjusts the sample’s stereo pan for the selected pad. Variable from -1 (L) to 1 ®.
- Gain Attenuates or boosts the amplitude, in dB, of the sample assigned to the selected pad. Variable from -∞ to 6 dB.
Filter Control
Each pad features a variable filter to allow anything from subtle tonal shaping to heavily processed filter sweeps.
- Filter Env
- Attack Adjusts the amount of time it takes for the filter cutoff frequency to move from the frequency value to the envelope value once a sample has been triggered. Variable from 0 s to 10.1 s.
- Hold Adjusts the amount of time the envelope value is held after the attack period and before decay begins. Variable from 0 s to ∞.
- Decay Adjusts the amount of time it takes to return to the cutoff level after reaching the envelope value. Variable from 0.98 ms to ∞.
- Envelope Adjusts the range of the filter envelope in octaves, relative to the cutoff value. Variable from -10 to 10. (The default value is 0, meaning the filter envelope has no effect.)
- Velocity Adjusts the maximum value in octaves affected by velocity . Variable from -10 to 10 (the maximum value when triggered note velocity equals 127).
- Cutoff Adjusts the cutoff frequency of the filter. Variable from 30 Hz to 16 kHz.
- Reso Adjusts the resonance of the filter. Variable from 0 to 100.
- Filter Type Selects the filter type. Choose from LP (low-pass), BP (bandpass), and HP (high-pass) and between 12 and 24 dB slopes.
Grouping Pads
Pads can be grouped so that when one pad in the group is triggered, the other pads in the group are choked, or silenced. You can add pads to one of four groups by doing the following:
- Select a pad you wish to assign to a Group by clicking on it.
- Click on the Choke select box and choose group 1, 2, 3, or 4.
- Repeat the process for any pad you wish to assign to a group.
Now, when a pad that is in Group 1 is triggered, all other pads in Group 1 are silenced. This, for instance, can be used to silence different hi-hat samples, so that when a closed hi-hat sample is played following an open hi-hat sample, the open hi-hat sample is silenced to prevent it from ringing through the closed hi-hat sound. This can add realism to your drum sounds.
Using Multiple Outputs
Impact provides eight stereo outputs and eight mono outputs for each pad. To change the output routing, click on the Output selection box below the desired pads and choose the desired Output Channel for each pad. If the Output Channel does not already exist in the Console, it is added automatically.
Text and image reproduced from the official Studio One Version 3.3.0 Reference Manual
Copyright © 2016 PreSonus Audio Electronics, Inc